思い付きベースですが、BigQueryを試してみたくなったので、
Twitter Streaming API からツイートを集めてBigQueryに流し込む仕掛けを作りました。
Twitter Streaming API というのは、Twitterの全タイムラインをリアルタイムに取得できるAPI。
レスポンスで大量のツイートが延々と返ってくるという、恐るべきAPIです。
http://lealog.hateblo.jp/entry/2013/03/10/100845
firehose(全タイムライン)/sample(左の軽量版)/filter(条件抽出) と、
3種類のモードがあるようですが、今回は「sample」を使ってみました。
ログの収集といえば、fluentdの出番です。
ここからしばらく、fluentdプラグインの設定について書いていきます。
インプットプラグインの設定
Twitter Streaming API をtail するfluentdのインプットプラグインがあるので、そのまま使います。
|
1 2 |
$ /usr/lib64/fluent/ruby/bin/fluent-gem install fluent-plugin-twitter $ vim /etc/td-agent/td-agent.conf |
インプットの設定は以下のとおり。
/etc/td-agent/td-agent.conf
|
1 2 3 4 5 6 7 8 9 |
type twitter consumer_key xxxxxxxxxxxxxxxxxxx consumer_secret xxxxxxxxxxxxxxxxxxxxxxxxxxxxxxxxxxxxxxxxx oauth_token xxxxxxxxxxxxxxxxxxxxxxxxxxxxxxxxxxxxxxxxxxxxxxxxxx oauth_token_secret xxxxxxxxxxxxxxxxxxxxxxxxxxxxxxxxxxxxxxxxx timeline sampling lang ja output_format flat tag twitter.raw.sampling |
話しが前後しますが、Twitter Streaming API を使うためには、Twitterアプリを作り、API Keyその他を取得する必要があります。
https://apps.twitter.com/
適当なアプリを登録し、上記設定に必要な4項目のコードを入手し、設定して下さい。
これで、fluentd を再起動すると、ツイートの収集が始まります。
アウトプットプラグインの設定
どんな形式のデータがTwitterから取得できているのか、見てみたいですよね。
試しにアウトプットプラグインで標準出力を選んでみると、目の当たりにすることができます。
標準出力すなわちfluentdのログファイルなので、下記の設定をしてからfluentdを再起動することで、実際のデータ内容を確認できます。
※慌てて中止したくなること請け合いなので、やる時は覚悟してやって下さいw
アウトプットの設定(取扱注意)
/etc/td-agent/td-agent.conf
|
1 |
type stdout |
ツイートが、jsonフォーマットの無限リストで取得できていることが分かりました。
※この設定は早めに解除しておいて下さいね。
ここで問題なのが、ツイートのデータの中には、ネストされた配列が含まれていることです。
2014-08-20 11:11:11 +0900 twitter.raw.sampling: {“created_at”:”Wed Aug 20 11:11:11 +0000 2014″,(…略…)”entities_user_mentions”:[{“screen_name”:”xxxxxx”,”name”:”xxxxxx”,”id”:xxxxxx,”id_str”:”xxxxxx”,”indices”:[0,10]}],(…略…)
BigQueryはデータセットとテーブルという概念で成り立っており、RDBMSのテーブルと同様、カラムごとに名前と型を指定することになります。
従って、上記のようにネストされた状態ではデータ構造が対応できず、そのまま流し込めません。
一旦、ネスト構造をフラットに変換するプラグインを導入します。
「flatten_hash」
http://www.nagaseyasuhito.net/2014/01/10/416/
今回の設定は以下のとおり。
/etc/td-agent/td-agent.conf
|
1 2 3 |
type flatten_hash tag twitter.sampling separator _ |
フラットに加工する、という作業がどういう事かというと、「separator」にアンダースコアを指定しているので、
|
1 |
entities_user_mentions:[{"screen_name":"xxxxxx","name":"xxxxxx","id":xxxxxx,"id_str":"xxxxxx","indices":[0,10]}] |
は
|
1 2 3 4 5 6 |
"entities_user_mentions_0_screen_name":"xxxxxx", "entities_user_mentions_0_name":"xxxxxx", "entities_user_mentions_0_id":"xxxxxx", "entities_user_mentions_0_id_str":"xxxxxx", "entities_user_mentions_0_indices_0":0, "entities_user_mentions_0_indices_1":10, |
になります。(説明がいい加減?意を汲んで下さい!)
さて、フラットに加工したツイートデータを、BigQueryに投げ込む設定を行います。
「bigquery」というプラグインを使います。
https://github.com/kaizenplatform/fluent-plugin-bigquery
今回の設定は以下のとおり。
/etc/td-agent/td-agent.conf
|
1 2 3 4 5 6 7 8 9 10 11 12 13 14 15 |
type bigquery method insert auth_method private_key email xxxxxxxxxxxxxxxxxxxxxxxxx@developer.gserviceaccount.com private_key_path /path/to/xxx.p12 project xxxxxxxxxxxxx dataset xxxxxxxxxxxxx table xxxxxxxxxxxxx field_integer id,retweet_count,favorite_count,user_utc_offset,user_listed_count,user_followers_count,user_friends_count field_string id_str,geo_coordinates_0,geo_coordinates_1,text,user_screen_name,user_time_zone,user_profile_image_url,created_at,user_created_at field_boolean user_geo_enabled |
上から順に、BigQueryのアカウント情報、流し込むテーブル情報、Twitter Stream API のデータのうち、BigQueryのテーブルに投入したいデータ項目、の順になっています。
JSONデータのフィールド名=BigQueryのカラム名、になっている必要があるので、BigQueryにテーブルスキーマ作成する際は、予めTwitter側のデータ構造を確認した上で行う必要があります。
ここまでで、fluentdの設定は、以下のようになっているはずです。
/etc/td-agent/td-agent.conf
|
1 2 3 4 5 6 7 8 9 10 11 12 13 14 15 16 17 18 19 20 21 22 23 24 25 26 27 28 29 30 31 32 33 |
type twitter consumer_key xxxxxxxxxxxxxxxxxxx consumer_secret xxxxxxxxxxxxxxxxxxxxxxxxxxxxxxxxxxxxxxxxx oauth_token xxxxxxxxxxxxxxxxxxxxxxxxxxxxxxxxxxxxxxxxxxxxxxxxxx oauth_token_secret xxxxxxxxxxxxxxxxxxxxxxxxxxxxxxxxxxxxxxxxx timeline sampling lang ja output_format flat tag twitter.raw.sampling type flatten_hash tag twitter.sampling separator _ type bigquery method insert auth_method private_key email xxxxxxxxxxxxxxxxxxxxxxxxx@developer.gserviceaccount.com private_key_path /path/to/xxx.p12 project xxxxxxxxxxxxx dataset xxxxxxxxxxxxx table xxxxxxxxxxxxx field_integer id,retweet_count,favorite_count,user_utc_offset,user_listed_count,user_followers_count,user_friends_count field_string id_str,geo_coordinates_0,geo_coordinates_1,text,user_screen_name,user_time_zone,user_profile_image_url,created_at,user_created_at field_boolean user_geo_enabled |
これで設定完了です。
再起動し、BigQueryにデータが流れ込んでくるのを確認します。
※今回は、BigQueryの契約や設定についての説明は割愛します。
BigQueryのデータで遊んでみる
ようやく本題に入れるところまで来ました。
が、ここから先は次回に…。
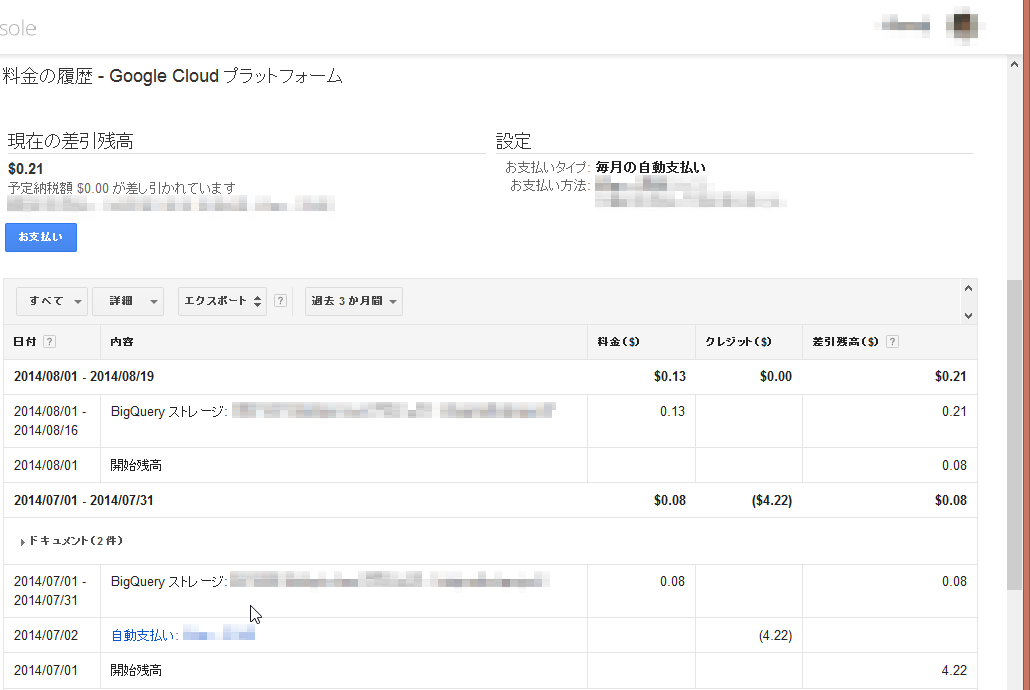
ちなみに、現時点(2014/8/19)で45,000,000レコード位ためることができていますが、
BigQueryに対する課金状況は、このとおりです。


