こんばんは。
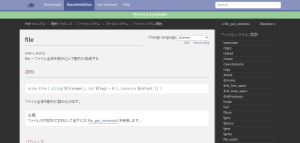
先日、PHPの公式を見ていたら走る象さんが現れました。画面左上。
拡大するとこれ。必死に走っていました。
この象さんは64分の1の確率で現れてくれるらしいです。
よかったよかった。
SkyBiometry使ってみました
話は変わりますが、最近「SkyBiometry」という顔認識APIを使う機会があったので、忘れないうちに書いてみたいと思います。
これは何ぞって、「写真のURLとパラメータを送ると、その写真の中にある顔の座標や特徴量を返してくれる」APIになります。
さらに、UID(user id)と同一人物の複数の顔情報TID(tag id)を結び付けて学習させることで顔認識の精度を上げることができ、且つ類似度の算出が可能になるみたいです。
まずsign up nowしてみましょう。
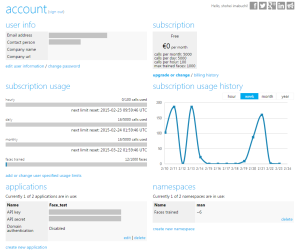
マイページはこんな感じです。APIを叩いた回数がグラフ化されており、API keyやAPI secret、UIDを束ねるnamespaceの設定が行なえます。ちなみに無料版ですと5000回/1ヶ月、100回/1時間叩くことができます。
API keyとAPI secretが入手出来たらあとは簡単です。
下記の形式でURLを叩くだけで結果を取得することができます。
http://api.skybiometry.com/fc/{API method}.{response format}
?api_key={自分のアカウントページのAPI key}
&api_secret={自分のアカウントページのAPI secret}
&{other parameters}
上記のAPI methodやresponse format、other parametersに関してはドキュメントのページに書いてあります。
例えば、「faces/detect」という顔を発見するAPI methodを使いたい、「JSON形式」のレスポンスで受け取りたい、WikipediaでFaceと検索して出てきた「顔の画像URL」の「顔座標をすべて取得」したい、という要望には下記の記述で答えることができます。
http://api.skybiometry.com/fc/faces/detect.json
?api_key={自分のアカウントページのAPI key}
&api_secret={自分のアカウントページのAPI secret}
&urls=http://upload.wikimedia.org/wikipedia/commons/thumb/5/55
/Mona_Lisa_headcrop.jpg/640px-Mona_Lisa_headcrop.jpg
&detect_all_feature_points=true
下記がレスポンスのJSONです。
|
1 2 3 4 5 6 7 8 9 10 11 12 13 14 15 16 17 18 19 20 21 22 23 24 25 26 27 28 29 30 31 32 33 34 35 36 37 38 39 40 41 42 43 44 45 46 47 48 49 50 51 52 53 54 55 56 57 58 59 60 61 62 63 64 65 66 67 68 69 70 71 72 73 74 75 76 77 78 79 80 81 82 83 84 85 86 87 88 89 90 91 92 93 94 95 96 97 98 99 100 101 102 103 |
{ "operation_id": "b0678e98d8714d46a70b328d3bc*****", "photos": [ { "height": 798, "pid": "F@049131163a6cb9ed055c437a0b4f75d7_8d713d23*****", "tags": [ { "attributes": { "face": { //信用度83で顔を認識 "confidence": 83, "value": "true" } }, "center": { //顔の中心の座標 "x": 50.16, "y": 36.47 }, "confirmed": false, "eye_left": { //左目の座標 "confidence": 50, "id": 449, "x": 50.0, "y": 31.08 }, "eye_right": { //右目の座標 "confidence": 50, "id": 450, "x": 35.16, "y": 31.08 }, "height": 24.44, "label": null, "manual": false, "mouth_center": { //口の座標 "confidence": 50, "id": 615, "x": 40.31, "y": 45.61 }, "nose": { //鼻の座標 "confidence": 50, "id": 403, "x": 39.22, "y": 39.47 }, "pitch": 0, "points": [ //ここから顔の詳細座標 { "confidence": 50, "id": 768, "x": 31.09, "y": 31.33 }, { "confidence": 50, "id": 769, "x": 30.0, "y": 36.22 }, { "confidence": 50, "id": 770, "x": 32.03, "y": 41.1 }, //この間、約60の座標を省略 { "confidence": 50, "id": 834, "x": 40.31, "y": 45.61 }, { "confidence": 50, "id": 835, "x": 39.22, "y": 39.47 } ], "recognizable": true, "roll": 0, "similarities": null, "tid": "TEMP_F@049131163a6cb9ed055c437a01410123_8d713d23a73*****.16_36.4*****", //TIDはこの写真のこの顔TAGに結び付いたID "uids": [], "width": 30.47, "yaw": 45 } ], "url": "http://upload.wikimedia.org/wikipedia/commons/thumb/5/55/Mona_Lisa_headcrop.jpg/640px-Mona_Lisa_headcrop.jpg", "width": 640 } ], "status": "success", //failureの際はエラーコードが付きます "usage": { "limit": 100, "remaining": 98, "reset_time": 1424692786, "reset_time_text": "Mon, 23 February 2015 11:59:46 +0000", "used": 2 } } |
顔の座標や特徴量が取れました。other parametersの設定(例えば「attributes=all」など)により、他の情報も取得できます。
GDで顔座標をプロット
PHPでAPIの返り値を使いたいので、curl関数を使います。curl関数の使い方はこのあたりを参考にさせていただきました。
|
1 2 3 4 5 6 7 8 9 10 11 12 13 14 15 16 17 18 19 20 21 22 23 24 25 26 27 28 29 |
//自分のアカウントページのものを定数化しておきます define("FACE_API_KEY", "********************************"); define("FACE_API_SECRET", "********************************"); define("FACE_API_METHOD", "faces/detect"); define("FACE_API_RESPONSE", "json"); define("FACE_API_URL", "http://api.skybiometry.com/fc/".FACE_API_METHOD.".".FACE_API_RESPONSE); //顔認識したい画像URLはこちら $url = "http://upload.wikimedia.org/wikipedia/commons/thumb/5/55/Mona_Lisa_headcrop.jpg/640px-Mona_Lisa_headcrop.jpg"; //APIたたく準備します $curl = curl_init(); curl_setopt($curl, CURLOPT_URL, FACE_API_URL); curl_setopt($curl, CURLOPT_POST, TRUE); //GETで渡していたパラメータはPOSTで送ります $params = array( "api_key" => FACE_API_KEY, "api_secret" => FACE_API_SECRET, "urls" => $url, "detect_all_feature_points" => "true", "attributes" => "all" ); //APIたたきます curl_setopt($curl, CURLOPT_POSTFIELDS, $params); curl_setopt($curl, CURLOPT_RETURNTRANSFER, 1); $response = curl_exec($curl); $header = curl_getinfo($curl); |
ここまでで、APIのパラメータの設定をしてその結果を$responseに格納することができました。
ここから、簡単なエラーチェックを行ない顔の座標をプロットして行きます。ちなみに顔の座標情報は「$data[“photos”][0][“tags”][0][“points”]」の中にあります。
|
1 2 3 4 5 6 7 8 9 10 11 12 13 14 15 16 17 18 19 20 21 22 23 24 25 26 27 28 29 |
//もろもろのエラーチェック $code = $header["http_code"]; //APIのHTTPコードをチェック if($code >= 400) { header("HTTP", true, $code); echo "レスポンスエラーです:".$response; exit; } $data = json_decode($response, true); //APIの実行結果をJSONパーサでパースし$dataに格納します if(count($data["photos"][0]["tags"]) > 1){ echo "顔が複数あります"; exit; }elseif(count($data["photos"][0]["tags"]) == 0){ echo "顔がありません"; exit; } //GDを使い元の画像からイメージ生成します $original_image = imagecreatefromstring(file_get_contents($url)); //座標をプロットしたイメージを生成して上記と重ねて出力します $plot_image = generatePlotImage($data["photos"][0]["width"], $data["photos"][0]["height"], $data["photos"][0]["tags"][0]["points"], $original_image); imagecopy($original_image, $plot_image, 0, 0, 0, 0, $data["photos"][0]["width"], $data["photos"][0]["height"]); //重ね合わせる header('Content-Type: image/png'); //出力します imagepng($original_image); imagedestroy($original_image); imagedestroy($plot_image); exit; |
21行目のgeneratePlotImage関数では、元の画像の顔の上に顔の座標点をプロットするため、透過可能なpngイメージを生成しています。22行目のimagecopy関数で元のイメージと前述した関数によって生成されたイメージとを重ね合わせています。
|
1 2 3 4 5 6 7 8 9 10 11 12 13 14 15 16 17 18 19 20 21 |
function generatePlotImage($width, $height, $points_array){ //点を相対座標から絶対座標に変換 foreach($points_array as $key=>$value) { $point = array($value["x"]*($width/100), $value["y"]*($height/100)); $points[] = $point; } //Create image using GD $plot_image = imagecreatetruecolor($width, $height); $white = imagecolorallocatealpha($plot_image, 255, 255, 255, 127); $green = imagecolorallocate($plot_image, 50, 255, 0); imagefill($plot_image, 0, 0, $white); //顔の座標に点を打っていきます foreach($points_array as $key=>$value) { imagerectangle($plot_image, $value["x"]*($width/100)-1, $value["y"]*($height/100)-1, $value["x"]*($width/100)+1, $value["y"]*($height/100)+1, $green); } return $plot_image; } |
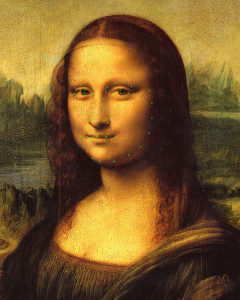
重ね合わせ生成された画像がこれです!
APIが認識した顔の座標点が緑色にプロットされていますね。
ではまた次回(゜-゜)


